Sometimes all kitchen cabinets need to look brand new is a splash of paint. Painting kitchen cabinets is a creative solution to a problem we all have: kitchen cabinets that look old, slightly depressing and in need of replacement. It’s also a solution that is much cheaper than actually replacing your kitchen cabinets. Before you start painting your kitchen cabinets, you have to figure out what the best paint for your kitchen cabinet is, the tools you will need and the stages you have to go through to paint your kitchen cabinets.
The Tools of the Trade
You will need the following tools to work.
- Paint: You want to get paint that is labelled “enamel”. When you are deciding on the kind of paint, you should factor in the sheen or glossiness of its finish. The greater the sheen, the more durable its finish will be.
- Angled paint brush: You should get a paint brush that is 2 ½ to 3-inches wide. The brush will have bristles cut at an angle so that you can paint clear lines. Thi9s is perfect for painting in corners and other angled spaces.
- Square paint brush: This 3 to 4-inch brush will enable you to paint narrow surfaces like window grids and narrow trims.
- Roller: You want a 4 to 6 inch foam roller to paint over the cabinet sides and face frames.
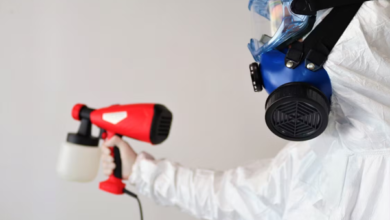
- HVLP Sprayer: For those who do not like to use brushes, sprayers are the perfect alternative and can give you an amazing finish. Make sure that the sprayer can be used on cabinets.
Stages of Painting a Kitchen Cabinet
Your kitchen cabinets will get very messy, so you should prepare a temporary kitchen until you have finished painting.
- Prepare Your Kitchen: Remove any items in the cabinet, clear your counters, and move any free-standing appliances like microwaves, fridges, etc. This will get messy so you want the kitchen as clear as possible. Mask the countertops and floors with masking paper. Use plastic sheets to tape over doors, backsplash, windows, and fixed appliances so they are protected from fumes and dust. Cover the walls around your cabinets. Create a workstation that gives you access to the entirety of your cabinets.
- Remove fittings: Unscrew your cabinet’s hinge screws and remove the doors. Mark each of the screws and items you have removed so you know how to put everything back together again.
- Determine your cabinets’ condition: if the kitchen cabinets have already been painted on, you can still paint over them, if the paint is in good condition. If the old paint is in bad condition, you will have to remove it first before you can paint. You will need to get stripping products to remove the old paint. You apply the stripping products with a brush, let it set and react with the old paint, and then use a plastic scraper to remove the old paint. When the cabinet has dried, remove the residue of the old paint with sandpaper. You will find that cabinet refinishing is one of the most exciting parts of the whole process.
- Paint the boxes: You’ve reached the promised land so get out your paint and start painting. If you are going to paint your cabinets with the same shade as the old paint, you can do that with two coats of paint. However, if you are painting with a dark finish and light color, you will need three coats. Start outside, painting across the grain. Inside the cabinet, use a smooth-surface mini-roller to give the texture a slightly bumpy feel.